23 December 2010

Deck the halls with conference posters, fa-la-la-la-la, la-la-la-laaaaa...


Doctor Becca reckons this is the best re-use of a conference poster ever, and I’m inclined to agree. So do many other people! I bugged Becca for the instructions, and she came through like a trooper:

Here’s how:

  1. Cut your poster into six equal-sized squares. You may have some extra bits, but it’s no biggie.
  2. Take one square, fold it into a triangle, and then again into a smaller triangle.
  3. Hold the triangle so that the fully folded side is on the bottom and the longest side is on the right.
  4. Cut four lines parallel to the longest side (cuts shown in blue) – make sure you don’t cut all the way to the left side, just cut so that there are four strips hanging off of the left side.


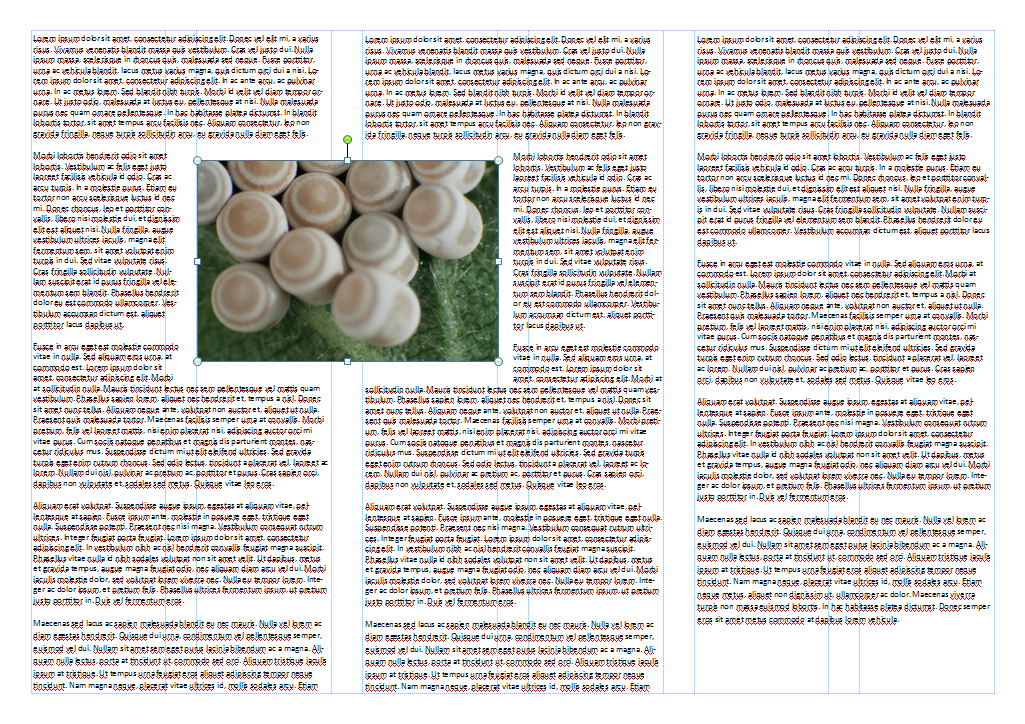
  5. Open up the square – it should look like this:


  6. Take the two innermost flaps and overlap them so they make a hollow tube. Tape them together.
  7. Flip the paper over to the other side, take the 2nd inner two flaps, overlap them slightly, and tape.
  8. Keep flipping, overlapping and taping until finished. Turn it on its side, and it will look like this:


  9. 1/6th of the snowflake is done!
  10. Do this with the other five squares.
  11. Once all your snowflake portions are made, arrange so that they’re in a nice snowflake configuration. Staple everything together in the middle, as well as the outer “x’s” so they’re not all floppy.
  12. Voila! Winter Wonderland!

Season’s greetings!

Related links

Original post

16 December 2010

Push pins : posters

Here’s another piece of information that might help conference organizers plan their poster sessions: How many pins do you need? Here’s how they do it at one of the biggest scientific conferences in the world:

I received an email from the Society for Neuroscience this week describing the wrap up of the last conference. It included this tidbit:

  • 110,000 push pins ordered to hold 15,116 poster presentations

This works out to 7.277 tacks per poster. An extravagance! You just need one tack for each corner, people!

But wait! There were eight poster sessions (two each, Sunday through Wednesday). Morning presenters could leave tacks for the afternoon presenters, who could leave tacks for the next day.

This means you effectively had 58.2 pins for each poster space.

That’s enough pins not just to attach your poster to the board, but to ensure it would not be cast adrift from its moorings should a small squall suddenly whip up in the middle of the convention center.

Related posts


Photo by Nrbelex on Flickr. Used under a Creative Commons license.

09 December 2010

Fade out

Earlier this year, I described my experience with printing one of my posters on fabric. After going the conference and presenting the poster, I brought it back and stuck it up in the hallway by my lab, as people often do with their posters.

I was surprised to watch the poster faded into near illegibility over the course of only a few months!

Here’s a picture from shortly after receiving the poster:


And here it is after a few months.


And just for the ultra-detailed comparison, here’s the original source of this picture.

Here’s how my name looked on the poster when I first checked it:


And here’s how it looks after some time in the hallway.


Fading was noticeable after about two months in the hall, I think. This poster is not in direct sunlight, though there is a hall light more or less right above it. Still, another poster right next to it has held its colour much better, and it’s over a year old.

If you print a fabric poster for a conference, keep the original files in case you want to reprint your poster.

Related post

Cut from whole cloth

02 December 2010

Grids on grids

You can’t go too far wrong with a three column grid on a poster.


If it’s very wide poster, 5 or 7 or some other odd number of columns might be appropriate. But I will admit, a straight three column grid can all get just a little... rectangular.


Here’s a trick I learned from the Babylonians. The Babylonians are the ones we have to blame for our twelve hour days. The Babylonians like counting in twelves, rather than ten. Ten can be halved... or divided into five. Twelve can be divided into two, or three, or four, or six. Much more practical.

Create a grid that can be divided in lots of different ways. Or, to think of it another way, create a primary grid (three columns) and lay a secondary grid on top of that. Here, a two column grid superimposed on each main column. That is, six columns total.

Now you’re still following a grid, but you have more options for placement, and you can create a little more visual interest without sacrificing a disciplined layout.


You see this technique from time to time in journal articles, which might have a two column text layout, but will occasionally throw in a figure that is two-thirds of a page wide.


Better to make a complicated grid than abandoning a grid.

25 November 2010

Bleeding ink

A poster is designed with pixels and light, but a poster is made of paper and ink.

It’s easy to forget the differences between the two.

At one conference I was at this year, some of the posters that “popped” used white text on a black background. They tended to have one drawback, though: the text was just a little too thin. It needed to be just a hair thicker.


When you print black text on a white background, the text is going to look ever so slightly larger.

When you print white text on a black background, the text is going to get ever so slightly smaller.

Ink always bleeds into paper. Even with high quality paper and a good printer, it will spread out from where it is placed. The finer the lines, the smaller the text, the more the ink spread comes into play. Failing to take that into account has frustrated type designers trying to capture the feel of classic typefaces.

On a computer screen, putting black text on white background is literally just the inverse of white text on a black background. But white letters emit light, so that if anything, a white letter on a black background will look more luminous on a screen, when ink spread will have the opposite effect when you print the poster.

This is why, as I discussed last time, you would want to have a wide variety of typefaces in your arsenal. For instance, here are some samples of a type called Sense. It comes in seven different weights, and each of those has a corresponding italic version (not shown here):


For a poster, you may want to step up from a regular weight to a medium, particularly if you want to use light text on a dark coloured background.

The other solution, of course, is to make everything on your poster bigger!

“me” picture by mightypeesh on Flickr, used under a Creative Commons license.

18 November 2010

Ninja type: Finding the right weapon

Pamela Wilson has a great guest post at IttyBiz about typography, called, “How to Become a Typography Ninja in Five Easy Steps.”

One day, I must learn the art of making snappy titles...

I want to elaborate on one of the recommendations:

(T)he typeface you choose should include regular or book; italic; bold; bold italic at the very least.

If you are working with just the fonts that came with your computer, you are probably getting a very limited set of weights. Sometimes, you don’t get a “book” weight. People will sometimes say, “Oh, that type is no good for text blocks,” but they haven’t seen all the variations of the type.

My computer comes with five versions of Gill Sans, for instance. You don’t have to go far to find that packages that contain over 20 versions of Gill Sans.

For posters, a wider range of type weights than those can be valuable. You might not need 20 versions of the same typeface, but you might need more than “regular.” I’ll talk about why next time. And, to return to the ninja theme, it has to do with bleeding.

Picture by simonella_virus on Flickr. Used under a Creative Commons license.

16 November 2010

Posterface

The Society for Neuroscience (SfN) is on of the biggest, most massive exhibitions of conference posters in the world. And this year, neuroscientists at the University of California San Diego decided to pay tribute to this with the release of a music video of the song Posterface by singing sensation, Lady GaBa.


A background in neuroscience is probably helpful to understanding some of the lyrics. But dang, those spiking neurons look so utterly at home in a music video that I’m surprised that they haven’t been used before.

But lest you think this is just recreation by some labbies who’ve dipped into their pharmacological sample, the UCSD team has also put up a web application whereby you can search for posters, upload pictures of posters, and rate them.

Meanwhile, it is encouraging to hear from the SfN floor that there is still so much room to grow this blogging project.  

There are still a lot of horrific posters out there.

And speaking of the cane toad of typefaces...

11 November 2010

Slash and squeeze

You’re using PowerPoint to lay out your poster, and you want to include this picture:


You open up PowerPoint 2010, select “Picture with caption” as the layout style, click to import the picture, and you get this:


Once again, PowerPoint is trying to help – just in an incompetent way. It recognizes that the proportions of the picture you want to use are different from the rectangle you’re trying to drop it in to, so it makes a decision that the best thing to do is to make the picture as big as possible, and crop whatever doesn’t fit.

The result is as good as you might expect from a machine blindly following a rule: not satisfactory.

Luckily, one of the improvements in PowerPoint 2010 is that there is a toggle to switch from cropping a picture to scaling a picture. Under “Picture tools: Format,” look for “Crop,” then drop down to select “Fit” rather than fill.


More insidious and common than cropping is squishing. I have lost count of the number of times I have seen distorted pictures in presentations and posters made with PowerPoint.


In PowerPoint 2003, pasting a picture into a box would cause PowerPoint to try to fit the picture into the space by matching the proportions, with results like you see above. PowerPoint 2010 seems to have fixed this problem.

Even so, I still see distorted pictures, presumably from people carelessly resizing pictures. (Use the corner handles when resizing, not the top and side ones!) I wonder if people get so used to distorted pictures that they don’t even realize they are distorted. I think people don’t know how to fix them.

To check that you have the correct proportions, and to correct them if you don’t, right click the picture, and go to “Format picture.”


Then, click on the “Size” tab and look for those height and width percentages. They should be the same. If they are not, first deselect “Lock aspect ratio.” Then, make the larger of the height and width ratios equal the smaller of the two values.


The order you do this matters! It won’t work right if you change the percentages, then removed the “Lock aspect ratio” box.

If you do it correctly, the picture is in the correct proportion. You can then position it to wherever you want on the slide.

04 November 2010

Don’t dangle

This poster is sound. I could quibble about the ever-present boxes, about there being a little too much text in the left column, but the fundamentals that make a better poster are there.

Except that it doesn’t fit in its allotted space.


This was not an isolated case. Because of the size and layout of the conference poster session, I was able to walk through and count how many posters dangled over the edges. There were 18 posters that didn’t fit on the board, out of 400 papers listed in the abstract book.

And the moral of the story for presenters is: Read the instructions!

And the moral of the story for organizers is: About 4.5% of your attendees will ignore my perfectly reasonable advice, which is going to cause problems if you have an unusual poster size.

Names and title of the authors redacted so they don’t think I was picking on them. Lots of other people didn’t read the instructions at this conference, either.

28 October 2010

Eye tracking

The skeptical poster maker reading this blog might say, “But this design stuff... well, it’s all a bit... loosey-goosey, innit?

“Even you yourself ‘ave said that some of the stuff designers say doesn’t stand up. Like the idea that it’s easier to read lowercase because of the shape of the words.”

You want research? Okay, here’s some research on how people read large pages that combine text and images. These are newspapers, not posters, but there’s little doubt that the two are fairly similar reading tasks. Some key findings from older studies:

  • Photos attracted attention. ... Color was a powerful tool that pulled the eye toward various parts of a page(.)
  • Eyes followed a common pattern of navigation. The majority of readers entered all pages through the dominant photo or illustration, then traveled to the dominant headline, then to teasers and cutlines, and finally to text.
  • Images were viewed more than text. Photos and artwork were looked at the most, followed by headlines and advertising, then briefs and cutlines. Text was read the least.

There are also more recent studies that look more at websites, but these also confirm some of the basic design ideas I’ve blogged about here.

  • Alternative story forms (including Q&As, timelines, lists and fact boxes) helped readers remember facts.
  • Large photos and documentary photos drew more eyes than small photos or staged photos. Mug shots received relatively little attention.

Now, you might kvetch that I’m not linking to peer-reviewed journals, but there are similar things in peer reviewed papers, like those listed in the references below. A quick peek at Holmqvist and Wartenberg (2005) reveals, for example, the number one factor that influences what people look at first and how long they stay looking at something?

Large size.

So make everything bigger, blast you!

It probably is the case that private companies are doing a lot of reports that are maybe not making it into the traditional academic literature. A lot of this kind of research seems to be in conference proceedings, which I understand is more traditional method of publication for engineering and the like.

Lots of interesting reading on what makes something readable and memorable!

Related papers

Chu S, Paul N, Ruel L. 2009. Using eye tracking technology to examine the effectiveness of design elements on news websites. Information Design Journal 17(1): 31-43. http://dx.doi.org/10.1075/idj.17.1.04chu

Holmqvist K, Wartenberg C. 2005. The role of local design factors for newspaper reading behaviour – an eye-tracking perspective. Lund University Cognitive Studies 127: 1-21. http://www.lucs.lu.se/LUCS/127/LUCS.127.pdf

Hat tip to Ben Goldacre.

21 October 2010

What poster viewers are thinking

There was a very small but high powered poster session this week. I wasn’t personally there, but a few photos found their way out, and here’s what I expect the viewer is thinking as he looks at some of these posters.

“Is that Comic Sans?”
“Couldn’t they have put the interesting data near the top of the poster?”
“Does everything have to be in a separate box?”
Whoops, forgot to mention who was in the audience above, looking at the posters...

Poster aficionado Barack Obama
These pictures are from the science fair held at the U.S. White House on 18 October 2010, courtesy of Matt Blum, writing on the GeekDad blog. Read more of Matt’s impressions of the event here.

Pictures used under a Creative Commons license.

19 October 2010

Paper is more portable than stone tablets

Tales of the Genomic Repairman presents 10 commandments for poster presentations. Lots of nice bits in there.

I will say in regards to number 7, though...

7th Commandment:  Have thy references.  Look if you reference a paper in your poster, bring a hardcopy of each with you and just leave it on the ground.  If someone is arguing a point with you that way you can yank the journal shot them the figure and tell em to eat crow.  Oh and have about no more than 10 references in your poster.

 ... that I’ve never had a conversation in front of a poster that would have been advanced by whipping out a reprint.

17 October 2010

The secret history of type

The Guardian has a lovely extract from a new book called Just my Type by Simon Garfield.

I look forward to checking it out, despite the Amazon blurb “why it's okay to like Comic Sans.”

And on reflection, I’d agree with that. It’s okay to like Comic Sans. It’s just not okay to use it.

14 October 2010

I’m looking through you

A coloured background can make a poster pop – when done carefully.

To make a coloured background work, pick your figures carefully. These are the big three pixel-based image formats.

JPG: This is the most popular and familiar format. It is used on the web routinely because it has a wider color range than previous formats (24 bit), and generally has smaller file sizes than other formats.

GIF: This format is older than JPG. It can’t render as many colours as a JPG (8 bit). You can also create short animated images in GIF format, though you couldn’t use that on a poster.

PNG: This GIF successor can render 24 bit colour.

One important difference between these formats is transparency. Here’s a demonstration:


The JPG on the left looks shoddy compared to the GIF on the right.

JPG images can’t do transparencies. Every pixel must be coloured. Images that fine against a white background, like a white sheet of paper, can suddenly be floating in a white rectangle on top of your beautiful poster background. And suddenly, you have started down the road to boxism.

GIF and PNG images can do transparencies, which can allow any underlying colour to show through. It’s not automatic; you do have to watch the setting when you’re saving the image.

If you have an existing JPG that you like, one workaround is to match the space around your image with your poster background. This isn’t difficult if you have a simple background colour, but quickly becomes a headache if you want textured or shaded background.

But if you’re going to go to that much effort to edit the picture, you might as well mask out the background areas, then save a copy in PNG format. This can take a little fiddling in your graphics editor to do, but the result is worth it.


Related posts

Will it scale?
Never let them see your pixels

External links

Wednesday Surgery on Jim Campbell’s Comic Book Lettering Blog

07 October 2010

Overcoming your fears in poster sessions

Over at the Women in Wetlands blog, Dr. Doyenne has been doing a wonderful series of posts looking at self-promotion. In a recent post, Socially Inept Scientists, she talks about how poster sessions are invaluable for those who are uncertain or shy. And let’s face it... that describes a lot of academics, and particularly scientists. I’ve added a little emphasis to her quote.

One very easy and less painful way to meet people is during the poster sessions. There are lots of people standing by their posters expecting (hoping) others will approach them. It’s very awkward for poster presenters to stand there waiting for someone to approach. So they will often be relieved when someone comes along and starts up a conversation. You also have lots of opportunities to meet many people – especially people doing work in your field. However, I’ve found it’s sometimes easier to talk to people who work on topics I know little about. By confiding to the poster presenter that you don’t know anything about their field puts them at ease. Students and young scientists are especially afraid some expert is going to come along and ask them a question they can’t answer or will disparage their work. So, they will be especially open to someone who knows little about their topic. Ask them to explain their work to you (you can say you’ve always been fascinated with the topic, but that it is outside your field). By doing so, you put them into the role of expert and you in the role of interested listener. Few people can resist an opportunity to be looked upon as the more knowledgeable in a conversation.

The rest of her series on self-promotion is wonderful, useful stuff. Check it out. Start with To Brag or Not to Brag, and carry through the rest of the September posts, and continuing through October.


Photo by TeodoraS on Flickr; used under a Creative Commons license.

05 October 2010

Coral reef science

Malaria, Bed Bugs, Sea Lice, & Sunsets, has an interesting gallery of posters from the 11th International Coral Reef Symposium, from July of this year.

Some are an overkill of words. Others let the data do the talking. And then some are just simply beautiful works of art, in my opinion.

30 September 2010

Dear conference organizers

Poster sessions can be the beating heart and transcendent soul of a conference, or the first thing on the list at the bitch session afterward. Here’s how you conference organizers can help your attendees love your poster session.

Give us space – lots of it. 15 square feet minimum. 20 square feet or more is even better. Get the square footage of the room you are planning on holding the session in, and divide it by the number of posters. (Hat tip to Jim Belanger for this observation!)

Not all at once. It’s tempting to put all the posters in a single related topic together. It makes them easier to find. But don’t forget, people who are presenting posters are often the the very people who most want to see those other posters on the same topic. Give presenters a chance to look around; they want to see other stuff, too.

Lighting. Too many poster session rooms are wannabe nightclubs. They’re just too dim. And given that scientists tend to make dubious colour choices, as I have documented in this blog many, many times, it can make it hard to read the poster.

Flat floor. What could possibly go wrong with posters on tripods on stairs?

Nothing in the walkways. Too often, there is a table stuck apparently at random in the the middle of a corridor. Suddenly, you have a traffic jam. Put everything at the end of the poster row.

Water. All that talking can make you thirsty. Make sure there is a source of water readily and constantly available that doesn’t require someone to leave the session for ten minutes. Other refreshments are nice, but nothing beats water.

Photo by kirinqueen on Flickr. Used under a Creative Commons license.

23 September 2010

PowerPoint posters: Don’t turn away for even a second

If you use PowerPoint to make a conference poster, remember that it’ll screw you if you’re not watching it closely.

It has the best intentions. It’s just trying to help. But intentional or not, it still screws you.

The problem arises when you try to stick a lengthy block of text into a text box that is too big. PowerPoint will try to make all those words fit.

It’s fairly obvious when PowerPoint changes the point size. Point size is prominently displayed on the ribbon, and when you right click the text. But point size isn’t the only thing PowerPoint fiddles with.


PowerPoint tries to preserve the point size whenever it can. To keep the words as large as possible, it will first rachet down the line spacing (a.k.a. leading). A mild case is shown above.

To check the spacing in PowerPoint 2010, right click the text and select the “Paragraph...” option. This will show line spacing options. PowerPoint 2003 users will go to the “Format” menu, then look for “Line Spacing...”


From there, you can set if from “Multiple” back to “Single,” or even better, a value bigger than 1.

You can turn this “autofit” option off, but you have to dig for it. In PowerPoint 2010, you have to go up to the “Customize Quick Access Toolbar” (The down arrow in the upper left) and pick “More commands.” You’ll be in the main “Options” menu, at the “Quick Access Toolbar” section. Look left and up to find then go to “Proofing” section. Then look for “AutoCorrect Options...” and pick the second tab, “AutoFormat As You Type.” Finally, uncheck “AutoFit body text to placeholder.”

No, the PowerPoint team don’t exactly go out of their way to make it easy to find.

Here’s the single spaced version:


This one paragraph on its own may not look so bad, but people making posters with PowerPoint often end up with a lot of text boxes. Because the PowerPoint squishes the text in each box differently, you can easily end up with of different line spacing all across the poster. One paragraph with single space, another paragraph with 0.8, another with 0.9...

Lack of consistency makes a poster look sloppy, even if a viewer may not be able to say exactly why.

Related posts

Leading thoughts

16 September 2010

Myths of beautiful text

Ian Millington has suggestions about making text look good. He’s talking about text on the web, but there is some material relevant to posters.

Some claims are supported more by tradition than anything else, but this is often the case with text. For instance, Millington, in agreement with many other typographers, claims:

First-language English readers recognize words by their shape(.)

Kevin Larson lays this claim to waste in one of the most epic articles I have ever read on the science of reading, complete with a lengthy reference list of peer-reviewed research articles.

Word shape is no longer a viable model of word recognition. The bulk of scientific evidence says that we recognize a word’s component letters, then use that visual information to recognize a word.

I also think Millington is too hard on sans serif fonts, geometric fonts, and white paper. (And, as a neurobiologist, I also think that he overuses the term “hardwired” for the brain.) But lots of good ideas nevertheless.

Hat tip to Chris Atherton, WildWinter, Jan Schultnik, and Daniel Tenner.

09 September 2010

RTFP?

What the least read book in the world?

The owner’s manual.

What fraction of your owner’s manuals have read completely? Your car? Your digital camera? Your graphics software?

Recently, I put up a Venn diagram showing what people put on posters versus what people want from posters. That resonated with some ideas that Kathy Sierra discussed in an online presentation. in particular, she showed another version of this figure from from her brilliant and much-missed Creating Passionate Users blog.


Which attracts you and makes you want to learn more?

Most posters look more like less like the brochures on the left and a lot more like the owner’s manuals on the right. I think posters look like owner’s manuals because people are aping journal articles.

Remember the trap? Making a poster is often the first time you’re thinking through the data. And it’s easy to think more about, “How is that data is going to go into the paper I eventually want to publish?” than “What’s right for the poster?”

Related posts

Should your first presentation be a poster?

Poster Venn

02 September 2010

Poster Venn


If you’ve presented or viewed posters, you’ve probably noticed there’s a lot of stuff on them that don’t really matter.

We put them on because we want to mimic scientific papers. References are a great example. Several of my colleagues are of the opinion that any academic work without a reference list is unacceptable. Listening to some, you’d think that such a poster would cause the conference hall to explode and leave every molecule in your body streaming away from the center of the blast at near the speed of light.

So we cave. We stick on a terminal reference list in Harvard format that nobody looks at. It might be shorter than the one in the published paper, but few dare to cut it entirely.

Graphic inspired by xkcd.

Related posts

References on posters
Containment

01 September 2010

Okay, you win

PowerPoint is the wrong tool for making posters.

But it is the most popular software for doing so, by a wide margin. So says the survey I ran on my blog all summer long, though the thick of the conference season (1 May to 31 August).

Over the coming weeks and months, I plan dig in to find the features that might allow you to cobble together a decent poster in PowerPoint. I recently bought Office 2010, which obviously includes the latest version of PowerPoint. I never upgraded to PowerPoint 2007, so I’m just starting to learn where all the knobs and dials are in PowerPoint 2010 compared to the 2003 version.

I may be holding my nose while I write the PowerPoint posts. And I’ll be admonishing you to get a real graphics software package every time. But they will be coming.

26 August 2010

More power! The poster with a plug

One of the most unusual posters I saw at the International Congress of Neuroethology meeting in August was this one, being presented by Yossi Yovel:


You might not immediately recognize what’s different about this poster. Title, data, and boxes, the omnipresent boxes... It is mounted a little low. And some might recognized that the story has already been published, which is slightly unusual for a conference poster.

Allow me to point out...


The video screen.

That’s right, they were showing video of their bats behaving on their poster. This took some work. They found a cheap, small portable television, and they had to make a fairly complex set of adjustable metal braces, to allow for the fact that they didn’t know the size of the poster board. You need to be close to a power outlet, as you can see in this “behind the curtain” shot:


It seems a much more elegant solution than trying to find some space to hold up a laptop screen to someone. I got wondering if there was a simpler way to do this, and I thought of this.

  1. Go online and buy some cheap second hand portable media player. There are lots that play video. An iPod nano, a Sansa, iRiver...
  2. Transfer the videos over.
  3. Add simple directions to the poster to the poster for how to see the video.
  4. Attach the player to your poster with some double sided mounting tape or something similar.

Reference

Yovel Y, Falk B, Moss CF, Ulanovsky N. 2010. Optimal Localization by Pointing Off Axis. Science 327(5966): 701-704. http://dx.doi.org/10.1126/science.1183310

21 August 2010

Academics and typefaces

Head over and see what Gripping Cell has to say on the subject. Hat tip to Biochembelle.

20 August 2010

Type crimes: Double feature


Yet again, proximity matters.

Photo by Wendie Lather on Facebook.

Additional: Oh dear. It’s a trend.

19 August 2010

Anything free is worth what you paid for it


“Free.”

The lure is strong, isn't it?

Dan Ariely has written about how "Free!" tugs hard on our decision making. We are overly likely to be lure in by the promise of anything free, even if it ends up costing you in the long run.

There are many free typefaces on the web. And you also get free fonts with some software packages, and most notably when you buy a new operating system. "It came with the system" is probably why Comic Sans became the cane toad of typefaces.

Font Feed discusses just how good free fonts are. The one point that I think is the most serious for academics making conference posters is number of characters:

Free and shareware fonts however are often restricted to the standard 26 letters of the alphabet, figures, and only the bare minimum of punctuation marks. It is quite common that suddenly you realise you can’t type that French name or that German idiom, nor put a ® next to a brand name nor a € next to a price, or that some punctuation mark is missing.

Or, if you're a scientist, put up that measurement in micrometers.

Caveat emptor!

Related posts

Incredible Presentations – Awesome Font Resources: SlideRocket post that covers both free and commerical sites.

Free fonts
Critique: RNAi and hepatitis C

Links

Picture by Lothann on Flickr. Used under a Creative Commons license. Yes, for free.

12 August 2010

Digital disasters

Michele Sullivan is a poster evangelist. She has a brilliant discussion of the joys of poster sessions:

Here are scientists just being themselves – taking pictures of friends proudly displaying their “babies,” unconcerned about microphones or accents, uninhibited by the formality of speaking before a crowd, congratulating the sharp conclusion, questioning the flawed method, pushing for the truth.

...and a much needed check on an experimental format: the digital poster session.

In almost 10 years of medical reporting, this is the first 100% digital poster session I’ve attended, and I have to say it was a sad sight.

This is the second time I’ve heard about a digital poster session. The first was from two colleagues in my department, who went to a small regional meeting (that shall remain nameless) earlier this year.

It was a disaster.

The were too many organizational problems in the set-up of the digital poster session to list, so I’ll just name one. The projector they used to show the posters was apparently not very good, and they projected on a wall rather than a screen, rendering almost everything unreadable. Nobody showed up for either the viewing or to answer questions.

Both my colleagues said it wasn’t worth their time.

I’m all in favour of innovation, but digital poster sessions need much more thought and tweaking before they can replace the traditional poster sessions. The essence of a poster session is the face to face, the personal. You have to corral the presenters and the viewers in the same room for the thing to work.

And you really need to read the rest of Michele’s post if you haven’t done so already.

Related links

Empty room

Photo by Brian Hathcock on Flickr; used under a Creative Commons license.

05 August 2010

No tacks

When I was a kid, I pretty much wrecked the paint in my room putting up Star Wars and spaceship posters. I used loops of masking tape to put up my posters, which were okay until you tried to take them down. Though I tried to be careful, more often than not, some of the paint (green) would come away with the tape.

I’m reminded of this because the conference that I’m attending this week sent me a rather stern email a few weeks back concerning my poster:

Fixing methods: Thumb nails are not allowed. Use adhesive materials

Fortunately, adhesive technology has come a long way since 1977. I particularly like the poster strips made by 3M, because they are made to be removed. They’re a soft, slightly spongy material with adhesives on both sides. The tab at the bottom has no adhesive, though, giving you a spot to grab it and slowly pull down. Because the material stretches, it tends not to shear and rip the paint.


I’ve used them quite a bit, and haven’t done much damage to the paint outside my office yet. I find them in the hardware and home improvement section of my local Wal-mart.

There’s also Velcro adhesive pads, but these only seem with it if you’re cycling through several posters on the same spot, which is not the normal conference situation.

Scotch make various kinds of double-sided mounting tape. These seem intended to be more or less permanent, though. I haven’t tried them yet, but they would seem to suffer from the same problem as the old loops of masking tape.

The conference organizers also said:

Poster material: Plastic, paper.  Fabric is not allowed.

I’m risking it anyway.(Yes, that actually is the poster I made for the conference this week.) Note to conference organizers: If you want your attendees to make their poster a certain way, tell them way in advance. Like, when you start registration.